Matt and Mike had some free time Saturday, so we hit the shop! September 27th was actually my birthday so it was a great gift.
First thing Matt and I did (well, really Matt), was weld the key into the collar. We left the collar on the motor while welding to ensure it would still fit later. We've got some great tolerances on the collar - it fits -tight-.
I was nervous about welding the collar while it was on the motor, but after asking a few people it sounded like it would be okay as long as we grounded to the shaft (so the current wouldn't need to find a path through the rest of the motor). Hence, the bolt...

My excitement during the welding process caused me to forget to take pictures, but here's a shot of the completed piece!

Matt just did a few quick spot welds while the collar was on the shaft. The finish welding was done after the collar was removed.
There was some progress on the coupler the previous couple weeks - Matt had 2 flanges created. One for the motor collar and the other for the clutch/transmission collar. Our next step was to attach the motor-side flange onto the motor collar.

A couple tack welds...

And finishing it off...

Matt had an engineered block to check its perpendicularity (wow, my computer says that's a real word!) It was dead on with the tack welds, but shifted a hair in the final weld. Should be good though!
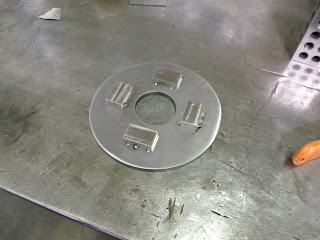
Originally we were planning on drilling holes in the clutch piece to attach it to the transmission-side flange, but we weren't sure how well the clutch would take the drill or the loss of material. In the picture above, you can see the clutch piece next to the motor collar. Instead of drilling, we decided to try machining blocks that would slide into the four holes of the clutch to transfer the torque from the motor.
Mike prepared a length of steel while we were working on the collar. It was time to cut up the steel into 4 blocks. You can see 2 of the cut blocks just above the air nozzle.

This is a pretty sweet machine...

It is refining the rough cuts into exactly the width required for the clutch. Matt operating the machine...

We used a pipe to ensure our clutch was centered on the transmission-side flange. Placing the newly created blocks...

And then tack welded them in place...

My help! Matt and Mike (brothers--obviously). Thanks for the help guys!

Here's the coupler (basically) done. You can see the steel blocks that will grab onto the clutch that will then turn the transmission shaft.

We spent some time trying to decide how to attach the clutch onto the transmission-side flange (and then, how to attach the transmission-side flange to the motor-side flange).
One thought was to not attach the clutch to the flange, but just let it be pushed into place when the motor was connected to the transmission. Unfortunately the transmission shaft is fairly long, and it will be a pain to try and get the shafts short enough for that to work.
Next idea was to drill holes in the 4 slots of the transmission flange where the clutch wasn't covering, and just bolt the transmission flange to the motor flange. Great, but how do you make sure the clutch piece stays on? Well just throw a big washer over the transmission-side flange that grabs the clutch as well! The power is delivered rotationally, so there will be little (if any) force pulling the pieces apart.
Another thought was to drill the holes through the flanges and through the new blocks. The holes through the blocks would be threaded though so just some bolts could hold the two flanges together. Clean solution, but it still has the problem of how to attach the clutch. It could be possible to weld (or bolt/however) strips of steel between the blocks so the clutch couldn't slide off.
We decided on just drilling through with 4 simple holes and using a big washer to hold the clutch on. Not as clean as I'd like, but it should work fine. Matt is going to finish it up at the shop later (hopefully this week!). Barring any major problems, the coupler is basically done!
Now we just need to start that adapter plate... Matt / Mike, you guys free this weekend?
2 comments:
I just found your blog off of a link from DIYelectriccar.
As a big fan of both LBCs and electric conversions, I heartily approve of this project. Best of luck integrating a malaise era Lucas electrical system into an EV conversion. You are a brave soul.
Thanks! You're actually the third person to warn me about these cars' electrical systems! It's been okay so far - hope it stays that way.
Post a Comment