Monday, October 27, 2008

Motor Adaptor Pt. 2

A couple weeks ago I had dimensioned the transmission bell housing for the adaptor plate. I test fit my plans with paper, but that's a bit more flexible than 3/8" steel. Instead of going straight to the machine shop, I decided to build one last test piece with 5/8" MDF board.


Drawn up, time to cut it out...


Finish drilling out the holes...


I test fit my new plate on the transmission, but the bolts didn't line up just right. No surprise though... I have inaccuracies in measuring the hole locations, marking the locations, and drilling them without a drill press. I went back through the 5/16" holes with a 3/8" drill bit to give myself a bit more play room.


Ah ha, fits! I'll overdrill the holes one size up with the metal plate too. I'm pretty happy with the dimensions thus far though.

Saturday, October 25, 2008

Tie Rod Boots

Back in August I gave the Spitfire's engine away to a gentleman from LA. As part of the trade he bought my friends and I In'N'Out hamburgers and a new set of boots for my tie rods!


I've finally got them in! Everything rubber in the car was completely destroyed, and the boots needed to be replaced. Here's a picture of the left boot.


Doesn't look like it was protecting too much. The toughest part in replacing the boots were getting the tie rod (that probably hadn't been touched in 30 years) disconnected from the wheel. I was afraid to just take a wrench to the nut and twist as I didn't want to damage the cap on the wheel side. Instead I tried to get two crescent wrenches, one on the nut and the other on a very small flat portion of the wheel side and unscrew them that way. Yeah that didn't work at all.

A friend (far more knowledgeable about cars than I) came by with a 3/4" wrench and took a stab at it. He just took a wrench to the nut, turned, and let the cap on the wheel side be the stop. Not two seconds later the parts were able to move. Sweet.


As we turned the nut with the wrench, the nut did not rotate on the shaft, the entire shaft rotated and unscrewed from the wheel side. With the tie rod disconnected, I pulled off the old boot and cleaned everything up.


I picked up some CV boot grease from the auto parts store. The box said cars typically use 4 oz per joint - I have no idea where to put 4 oz of this stuff!


And the boot in place! The boots came with some plastic tie wraps, but I had a few leftover worm clamps that I decided to use instead.


Then to the right side.


Terrible, but not for long.


Now I know why they say 4 oz - half of it ends up on your hands!


When putting the wheel back on, you can't take a wrench to the nut - it will unwind from the shaft. Instead, I took a rubber clamp thingee (technical term) to grasp the shaft and rotate the tie rod back onto the wheel. Be sure to not worm clamp your boot onto the shaft until after you've reattached the wheel. Otherwise as you rotate the shaft you'll also turn the new boot.


And completed.


Looks darn good!

Monday, October 20, 2008

Upper Shelf

When I first got the car my friends and I degreased, primed, and painted the engine compartment but left the upper shelf alone. After I put the Pot Box in a few weeks ago I realized how bad the upper shelf of the hood looked. It was time to restore it as well. My wife's mom is in town, and she helped me out with the restoration. She is definitely thorough when it comes to cleaning. :-)

First the battery compartment:
Dirty...


Clean...


Primed...


Painted...


And the rest of the shelf:
Dirty...


Clean...


Primed...


Painted...


Looks great!

In other news my relay and contactor have arrived. The relay will be used as an electric switch to turn the controller on/off when I turn the key. The contactor, basically a big relay, will open and close the flow of my 120V lines. I'll hook it with my Pot Box as an additional safety feature.

Monday, October 13, 2008

Motor Adaptor Pt. 1

The coupler is almost done, but it won't do any good without the motor attached to the transmission. I spent the past weekend getting the dimensions of the transmission housing so the adaptor plate could be machined.

I'm sure there are 100 better ways to do this, but here's my method... I took a sheet of posterboard and cut it roughly to fit around the transmission. I then punched a hole in the center for the transmission shaft.


Next I got out some shoe polish and started rubbing it along the transmission housing. When I push the posterboard against the transmission I should get a decent impression.


Pealing back the posterboard from the transmission...


I measured a few more dimensions and took a permanent thin tipped marker to draw out the bolt holes so they would show up a little bit better.


Then in AutoCad I drafted up the measurements of the housing shape and bolt locations. I don't have a large format printer, but after a short trip to Kinkos I had it printed on 17" x 22" paper. A quick test fit of the paper on the transmission...


Well it didn't fit quite perfect. Actually it was way off. The reason, I wrote down 4" instead of 5" for one of my bolt dimensions. Measure twice, cut once, oh well. So I fixed the dimensions, reprinted it at Kinkos, then test fitted it again on the transmission. Still off but very close. I adjusted a few of the bolt holes by a degree or so and re-reprinted it at Kinkos.

Success! Here are the final AutoCad plans:


And printed / cut out...


The transmission housing...


With the new adaptor plate template...


The motor...


With the new adaptor plate template...


I'll actually have the bolt holes drilled out a bit larger on the adaptor plate to give it some more wiggle room when its mounted. (Not that I don't trust my great tolerances! Right...) Now I just need to get to that machine shop... Matt, you free this next weekend?

Sunday, October 5, 2008

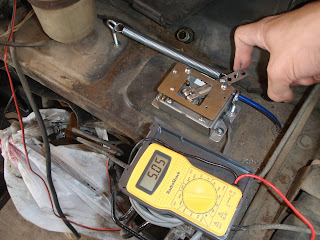
Video: Pot Box

The new Pot Box in operation!

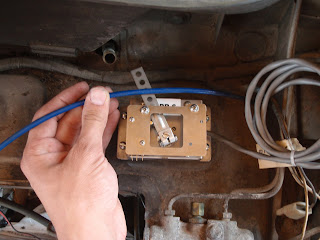
Pot Box

Electric vehicles are throttled via the motor controller, and to tell the motor controller how much power to deliver you use a Pot (Potentiometer) Box. It is a variable resistor designed to connect to the existing throttle cable from the accelerator pedal. For my car, I bought the PB-6 Pot Box. Its resistor ranges from 0 to 5k Ohms (standard among controllers), and it includes a micro switch for additional control/protection.


Just a note for you EV converters out there - the price on the Pot Box (and any EV component for that matter) varies widely among vendors. Definitely shop around.

Here's where I'm going to put it. There is a sharp turn for the accelerator cable which I don't like, but it is in a very clean place and the cable itself will be very short.


There was a bracket there for a hose going through the firewall that I removed. I think the hose was for the heating / ventilation system - I'll have to work on that later. The screw on the right held the bracket in place and a support for cabling underneath.


There is enough clearance underneath the Pot Box for the right screw to not be a problem so I'm leaving it in. Time to drill a few holes.


I also need to cut the accelerator cable back. The cable actually consists of several pieces - an inner steel cable that slides back and forth, a smooth plastic sheathing enclosing the cable, a segmented metal sheathing enclosing the plastic, and then a shiny blue sheathing making it all look pretty. The segmented metal was pretty tough, but my Dremel easily took care of it.


I added two eye hooks purchased from Home Depot - one to help hold the accelerator cable in place and the other to hold a backup spring for the Pot Box. The Pot Box is spring loaded, but just in case that spring fails I've added an additional backup. It is required in some countries - I don't know if it is in the U.S. but seems to be a good precaution nonetheless.


Looks pretty darn good. I also made a few adjustments to the other end of the cable. The floor pedal had nothing holding it up other than the cable, and I didn't want the weight of the pedal to drag on the Pot Box. Another spring should take care of that.


This picture actually has the pedal slightly depressed. You can see the accelerator cable connected to the pedal itself - pretty freaking simple and cool. For those of you installing a Pot Box and having trouble getting full throttle - it wasn't perfect on my first shot. I had to adjust the throw length of the pedal and my attachment of the cable to the Pot Box arm to get a full swing.

The final product with no power.


The final product with full power.


Nice!

I also purchased some wiring loom for the 12V lines running underneath my hood.


Double Nice!