The car has a new top! I spent the long weekend installing the new convertible top my wife bought me. It came with some generic instructions, but they were too vague to help me with the Spitfire. So after a bit of searching on the Internet I found a guide to installing tops on Triumph Spitfires! I honestly read through most of the instructions and did almost half of them!
The first step was to attach the back of the top to the rear bracket. After 3 small rivets and some glue, the back seemed to hold pretty well.
The rear bracket is attached to the car with two bolts. Once those were in place I pulled the new top over the frame.
The top is attached to the middle supports by snaps. Now this is how all car parts should be installed!
The next step was to lock down the frame and stretch / clip the new top in place. According to the instructions, I needed to stretch and reclip several times a day for three days.
Day 1...
Day 2...
Day 3...
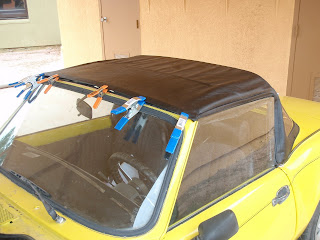
Our cat Bailey likes the new top...
Things are looking pretty tight. It's time to get this thing on permanently.
We folded back the top and prepared the area starting with the center. My wife and I drilled holes through the fabric for the rivets, applied glue across the area, then riveted the center strip in place.
My help: a hot young blonde holding a rivet gun in a car. Nice. :-)
We repeated the process for the side strips...
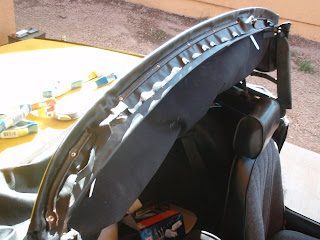
And then trimmed off the excess...
The last step was to snap the rear corners of the top to the car.
The final product!
Checking out the rear...
Quite an improvement over the old one...
And now time to stare at the car for a hour.
That really is a sweet ride. (My disclaimer... I do not recommend anyone using my steps to install their new convertible top. What I said above about doing half the instructions, yeah that was an exaggeration, I did like a quarter of them...)
Sunday, August 31, 2008
Sunday, August 24, 2008
Vacation & Removing the Top
As you can imagine it has been getting quite hot here in Phoenix, so my wife and I decided to take a little road trip to greener lands before her school starts back up.
Look! It's green! Been a while since we've seen that color!
I haven't had too much progress on the car the past couple weeks, but I did start replacing the convertible top. My wife bought me the new top for my birthday. She's so wonderful. :-)
The old top...
This thing had to come off. The back was very easy. There were a series of snaps along the corners that come right apart. Then I just had to unbolt the metal bracket that was holding down the top along the rear window (you can see it in the picture above). There was some glue holding the top onto the bracket, but it came off fairly cleanly.
I was all excited about how easy this was going until I started on the front. Rivets. Not that riveting is difficult, I just didn't have any of the tools.
There were 3 metal strips that were riveted along the front to hold the top on. A short one near either corner and a long one that went most of the length of the top. I ripped out the rivets with some pliers and pulled off all the metal strips.
The long strip across the center...
Pulling back the top revealed some glue that was holding it together...
Nice...
All and all the removal was very easy. The pictures I took were as much to remind me how to put the new one on as they were to document my progress.
Unusual statement, but it's not as sexy topless.
Colorado...
Look! It's green! Been a while since we've seen that color!
I haven't had too much progress on the car the past couple weeks, but I did start replacing the convertible top. My wife bought me the new top for my birthday. She's so wonderful. :-)
The old top...
This thing had to come off. The back was very easy. There were a series of snaps along the corners that come right apart. Then I just had to unbolt the metal bracket that was holding down the top along the rear window (you can see it in the picture above). There was some glue holding the top onto the bracket, but it came off fairly cleanly.
I was all excited about how easy this was going until I started on the front. Rivets. Not that riveting is difficult, I just didn't have any of the tools.
There were 3 metal strips that were riveted along the front to hold the top on. A short one near either corner and a long one that went most of the length of the top. I ripped out the rivets with some pliers and pulled off all the metal strips.
The long strip across the center...
Pulling back the top revealed some glue that was holding it together...
Nice...
All and all the removal was very easy. The pictures I took were as much to remind me how to put the new one on as they were to document my progress.
Unusual statement, but it's not as sexy topless.
Sunday, August 10, 2008
Motor Coupler Pt. 1
The motor arrived earlier in the week, but there is still quite a bit of work before it can be put in the car. I actually need 3 pieces manufactured:
1. Coupler to link transmission shaft to motor shaft.
2. Adapter plate to link motor to transmission housing. (The motor and transmission must be linked solid with no play between them.)
3. Motor mount.
Yesterday and today was spent making item #1. Matt, one of his friends, and I were in the machine shop for quite a few hours to get a start on it. Although I won't be using the clutch in my conversion, we decided to use the inner piece of the clutch assembly for our coupler. It has a series of teeth to match with the transmission shaft that we didn't want to manufacture.
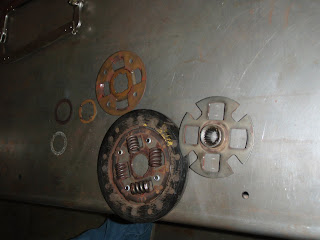
To dismantle the clutch assembly, Matt ground down the four spacers then popped it open with a flat-head screwdriver.
The piece on the far right is what we'll use for part of our coupler.
The design will consist of a steel collar around the motor shaft with a key inset into the motor shaft. A flange will then be welded to the collar with bolt holes. Holes will also be drilled into the toothed plate salvaged from the clutch. Bolt the salvaged plate to the newly created flange and we have our coupler. An additional bolt will hold the coupler onto the end of the motor shaft. Clear as mud right?
Creating the steel collar for the motor shaft...
Room for the key...
The clean motor shaft...
With part of our new coupler...
My help...
In other news, the removed engine parts have found new homes! Some have been sent to Texas while the rest took a drive to Los Angeles.
Good luck on your restorations guys!
Monday, August 4, 2008
Saturday, August 2, 2008
Motor Bay Prepared
Over the past week several friends came over to help clean out the engine (er, motor!) bay and get it all prettied up. Thanks Omayra, Matt, and Luke!
Before cleaning...
After cleaning...
Primed...
Painted...
Very nice! It actually could use 1 more coat of paint, but Checkers Auto Parts was out of stock so I'll have to finish it up later. I'm still calling it done though!
You can see a few of the pieces were not cleaned / primed / painted. I could spend months on just cleaning out all the grease from under the hood, but I'll just get to them as required. All the parts that needed to be painted before the motor and battery components go in are finished.
A few people have asked me why I'm converting my car (or they've assumed it's just about saving money). I've got several reasons actually!
#1: Get off Middle East oil. I'm doing my small part to not send $150/barrel oil to people that hate us.
#2: Save money! The car will cost about 50 cents in electricity for 30 miles range. If you include life cycle degradation on the batteries, it's about $1.50 for 30 miles. Not too shabby.
#3: I've always got some crazy project going on. It's fun learning new things - especially something so hands on with so much value in the end.
#4: Potential business venture... A small side business of curing people's addiction to oil by converting their cars to full electric would be fun, challenging, and very rewarding!
Subscribe to:
Posts (Atom)